*Buy now, pay later in 4 interest-free installments *30-day full coverage *1-year limited warranty *Choose from various affordable shipping methods


Before commencing the installation process, we strongly urge users to check the local laws thoroughly review this installation procedure and assess the time, knowledge, and resources needed to successfully complete it. PLEASE ALSO REVIEW THE DISCLAIMER AT THE END OF THIS INSTALLATION GUIDE.
While GLOSHOPfx’s kit offers a relatively straightforward connection, a fundamental understanding of the car’s electrical system and a certain level of physical fitness are prerequisites.
It is highly recommended that the installation should be completed in one continuous session, as driving the car with an incomplete installation is not advisable. You may take short breaks if needed, but DO NOT OPERATE THE VEHICLE WITH AN UNFINISHED INSTALLATION. We recommend ensuring that all necessary components and tools are readily available before embarking on the installation journey.
Typically, the entire installation process may span from 3 to 6 hours or it may even take longer, depending on the car’s make and model and the user’s level of knowledge and expertise.
If you choose not to undertake the kit installation by yourself, we recommend seeking the assistance of a professional service provider. The Edifier Inc. team, based in Toronto West, boasts extensive experience in installing similar kits and is more than willing to assist you in installing your underglow kit promptly and affordably. Please call them at 416-766-2626 for appointment.
User acknowledges and assumes all risks associated with kit installation. GLOSHOPfx, its affiliates, owners, and staff are not liable for issues, guidance errors, or misunderstandings during installation. The user is solely responsible for any resulting consequences. GLOSHOPfx and affiliates are not liable for issues, damages, or injuries during or after kit installation by the user or related parties.
Before embarking on the installation process, prioritize safety by turning off the car engine, and ensuring the car’s electrical system is off. It is recommended to take battery’s ground terminal off from the battery.
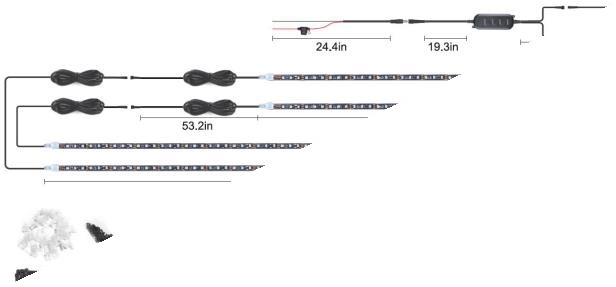
The LED strip sizes may vary depending upon the kit you ordered.
Set your vehicle on a clean, dry, and safe surface, preferably having some extra space in front of your car for easy LED strip testing.

he LED lights should now illuminate. If not, press the power/ON button on the remote controller. This is the time to download the mobile app. The QR code for the mobile app is here:
You might need to setup your mobile app as per the following procedure before you can utilize it or to test various colors and lighting patterns.
This would be a good time to install the Magic-LED app and familiarize yourself with a flood or colors you are about to add to your car. For installing the app please use the QR code provided in the installation guide or elsewhere in the kit.
a. Disconnect the car battery negative or ground terminal once again. Disconnect all the LED strips from each You can keep the GLOSHOPfx’S power cables alongwith the controller connected.
b. Locate a suitable position to secure the Ideally, try to find an existing mounting point where you can install the controller using screws. However, if this is not feasible, identify a secure location ensuring the controller is not in close proximity to moving parts and does not obstruct access to critical or frequently accessed areas. Optimal placement is on the rear or sides of the engine bay. Avoid fixing it onto moving parts, hose pipes, or the front near the radiator. In cases where screw installation is not possible, utilize zip ties to firmly position the controller. The black sleeve on the wires connected to the controller is a specially designed, fire- resistant, and heat-resistant glass fiber tube, capable of withstanding temperatures up to 200°C. Do not remove it, as it serves to protect the wires from potential damage, even if they come into contact with hot surfaces in the engine bay.
c. Elevate your vehicle using suitable ramps or lifts, or be prepared to work safely beneath theLocate a suitable position to secure the Ideally, try to find an existing mounting point where you can install the controller using screws. However, if this is not feasible, identify a secure location ensuring the controller is not in close proximity to moving parts and does not obstruct access to critical or frequently accessed areas. Optimal placement is on the rear or sides of the engine bay. Avoid fixing it onto moving parts, hose pipes, or the front near the radiator. In cases where screw installation is not possible, utilize zip ties to firmly position the controller. The black sleeve on the wires connected to the controller is a specially designed, fire- resistant, and heat-resistant glass fiber tube, capable of withstanding temperatures up to 200°C. Do not remove it, as it serves to protect the wires from potential damage, even if they come into contact with hot surfaces in the engine bay.
d. Keep two extension wires connected to the two cables emerging from the Route the cables to the lower side of the car, avoiding moving components, belts, pulleys, and ot surfaces.
e. Elevate your vehicle using suitable ramps or lifts, or be prepared to work safely beneath the car.
Start with the front LED strip installation:
a. Position one end of the front strip in the exact middle of the car’s front side, underneath the vehicle.
b. Gently guide the other side of the Front LED strip toward the right side of the car’s front, shaping it to fit the car’s curved body.
c. LED strips are flexible and can bend up to 10-25 degrees, depending on the curve’s length.
d. Thoroughly clean the selected surface with an alcohol-based cleaner, ensuring it is free from dust and grease.
e. Remove the protective plastic from the sticky side of the LED strip and carefully apply it to the cleaned area under the car’s body.
f.Before applying the LED strip to the designated place, it is recommended to use a heat gun or cigarette lighter to lightly heat the sticky side of the LED strip.
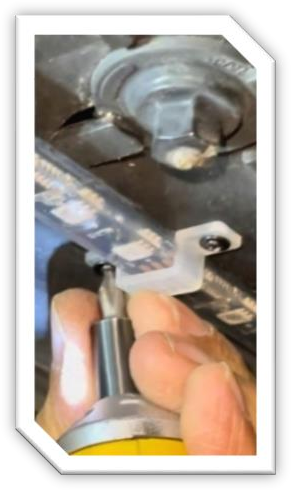
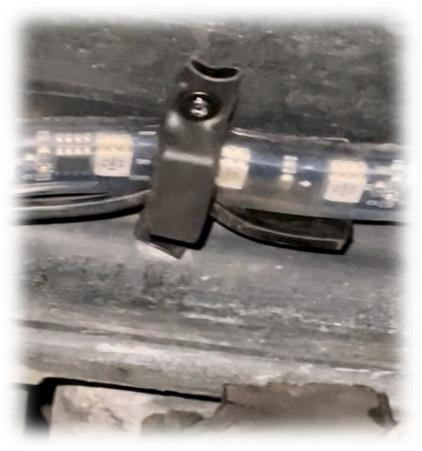
g. After successfully affixing the LED strip beneath the car body to its full extent, secure the strip in place using the provided clips and screws. The kit includes 40 clips, consisting of 20 clips each measuring 12mm and 14mm. In certain areas, external methods may be necessary to conceal or hide the LED strips effectively. GLOSHOPfx kits are equipped with 6 feet of GloShield silicon L-shaped strips, tailor-made for this purpose. Opt for the 12mm clips where GloShield is not used.
h. However, when employing the GloShield LED strip hiding silicon strip, utilize the 14mm clips. The clips, crafted from flexible yet sturdy plastic, exhibit an interesting phenomenon – if installed directly above the LED bead, they may act as reflectors and emit a glow in the dark. To mitigate this effect, consider using 10mm diameter heat-shrinkable tubes. The kit provides 15 heat shrink tubes tailored to the required size. Simply slide the 14mm clip into the heat shrink tube, secure it with a tweezer or plier, and apply heat using a heat gun. Once the tube shrinks, the clip will be entirely covered with the opaque black heat shrink, preventing it from illuminating in the dark.
Repeat the abvoe process for the side and rear LED strips.
Exercise caution when installing the rear LED strips to avoid contact with the car’s exhaust system. Ensure that the LED strips are discreetly placed to only reveal the glowing effect on the ground. Use gloshield black silicon hiding strip where it is deemed necessary.
You can always order for extra length of GLOSHIELD hiding strip and extra clips from our webstore gloshopfx.com
Determine the best point in the installation process to connect the cables between the controller, front strip, and subsequent strips based on your vehicle’s make and model.
Ideally, make these connections just after adhering the strips to the car’s surface. And after securing them with the provided clips.
Bundle any excess wire length and secure it with provided zip ties.
Conceal the wire bundle beneath the car’s body, taking care to prevent it from making contact with the ground or any moving components.
Double check if all are properly connected and secured.
a. Get back to the engine bay.
b. Connect the car battery negative terminal to the battery, turn the GLOSHOPfx underglow controller ON by pressing “ON” on the provided remote controller.
c. Use the mobile app to select your favorite color and the flow pattern.
Your GLOSHOPfx Car Underglow Kit is now expertly installed, enhancing your vehicle’s aesthetics with striking LED lighting while prioritizing safety and preserving your car’s battery. Enjoy the mesmerizing glow as you hit the road!
Enjoy!
If you encounter any issues or are unsure about any step of the installation process, it’s advisable to seek professional assistance or contact GLOSHOPfx’s customer support for guidance.
Solution: Check the power cable connections and ensure its properly connected to the car battery. Check the fuse on the red power wire. Verify that the controller is receiving power and try pressing the power/ON button on the remote control. The included SP105e controller (housed in controller metal box) can drive many different type of LED flow control chips. Make sure that in the mobile app setting, the chip is selected as 2811. Selecting different chip might result in malfunction or complete blank.
Solution: Ensure that the protective plastic line has been removed from the sticky side of the strip. Make sure the installation surface is clean and free from dust or grease. Use an alcohol-based cleaner to clean the area thoroughly. Heat the sticky side of the LED strip with a heat gun before applying it for better adhesion.
Solution: This could be due to a loose connection or a low battery power. Check all cable connections, including the controller to LED strip connections. Check the battery voltage. Please charge the battery if the battery voltages are below 11 volts. Start the car and check once again. If the issue persists, contact customer support for more assistance. The included SP105e controller (housed in controller metal box) can drive many different type of LED flow control chips. Make sure that in the mobile app setting, the chip is selected as 2811. Selecting different chip might result in malfunction or complete blank.
Solution: First, ensure that the remote control has a functional battery. You can see it by looking at the LED on the remote control while pressing any button on the remote control. If the battery is good, make sure you're within the remote's effective range (usually around 20 feet) when using it.
Solution: While it's possible, it's not recommended as it bypasses safety features provided by the car's electrical system. Direct wiring should only be considered if your vehicle's electrical system is sensitive to aftermarket electronics.
Solution: Usually, aftermarket car electronics draw a small amount of power even when turned off using the app or remote controller that comes with the underglow kit. This minor yet continuous battery drain can be problematic, especially during sudden weather changes, potentially requiring a jumpstart to start the car. Moreover, it may lead to long-term issues, as a drained battery could cause the computer and security features in your car to shut down. To tackle this, GLOSHOPfx offers a robust, yet highly affordable solution – a remote-controlled battery protection system. Contact GLOSHOPfx for more details or to schedule an appointment for installing this battery protection remote switch.
Solution: Bundle any extra wire length neatly and secure it using zip ties. Then, hide the wire bundle under the car's body, ensuring it doesn't touch the ground or moving parts.
Solution: If the LED strips are damaged, contact GLOSHOPfx customer support for replacement parts. Avoid using damaged strips, as they may not function correctly and could cause damage to other part of the kit. This could pose a safety risk as well.
Solution: Consult your vehicle's manual or a mechanic to locate a suitable grounding point. Ensure that the chosen point is clean and securely fastened.
Solution: While using ramps or lifting the car provides easier access, it's possible to install the kit without them. You'll need to work carefully under the car, following safety precautions used by professional mechanics.
Remember that if you encounter any issues or are unsure about any step of the installation process, it’s advisable to seek professional assistance or contact GLOSHOPfx’s customer support for guidance.
Even though our GLOSHOPfx underglow kit is user-friendly for installation, we want to ensure that you have options that best suit your needs. If you choose not to install it yourself or simply prefer the expertise of our team, we offer discounted professional installation services for our customers who bought underglow kit. Our dedicated team is ready and excited to assist you in bringing the magic of our underglow kit to your vehicle. Your satisfaction is our priority.
Certain products offered by us are intended exclusively for OFF-ROAD USE ONLY. We strongly advise you to consult with your local highway patrol or Department or Ministry of Transportation or Motor Vehicles (whatever it is referred to locally) to ascertain and adhere to pertinent rules, regulations, and information applicable to such products. GLOSHOPfx assumes no responsibility for any legal implications arising from the purchase of products from our establishment.
We hereby assert our prerogative, without incurring liability or furnishing prior notice, to amend, discontinue, or withdraw from circulation any or all of our products, as well as to decline or revoke any orders.
While GLOSHOPfx endeavors to uphold the precision of product information, we disclaim liability for any typographical, photographic, or technical inaccuracies.
By making a purchase of our product, the buyer hereby implicitly acknowledges and consents to adhere to the terms and conditions outlined by our company.
Get all the latest information on Events, Sales and Offers. Sign up for newsletter today.
Welcome to GLOSHOPfx, where our dedication to excellence extends beyond the creation of cutting- edge car underglow kits.
30-day full coverage, 1-year limited warranty.
Buy now, pay later in 4 interest-free installments.
Choose from various affordable shipping methods.
© 2024 The Edifiers. All Rights Reserved. Built with ❤️ by Manish P. Mudgal